Battery switch on travel trailer function is crucial for managing your RV’s power. Understanding how to use your battery switch correctly ensures you have power when you need it and protects your electrical system. This guide will walk you through the different types of switches, how to connect and disconnect your batteries safely, troubleshoot common problems, and integrate your switch with other electrical components like solar panels.
We’ll cover everything from basic operation to advanced troubleshooting, providing clear instructions and diagrams to help you confidently manage your travel trailer’s power system. Whether you’re a seasoned RVer or a first-timer, this guide will empower you to keep your lights on and your appliances running smoothly.
Understanding Battery Switch Functionality in Travel Trailers
Your travel trailer’s battery switch is a crucial component for managing your power sources, ensuring efficient use and preventing accidental drain. Understanding its function and operation is essential for a smooth and enjoyable camping experience. This section will explain the different types of switches and how to use them correctly.
So, you’re planning a trip? Awesome! Don’t forget travel insurance! Check out Aon travel insurance for comprehensive coverage. They’ve got options for everything from lost luggage to medical emergencies. Seriously, it’s a lifesaver. And if you want to see what other travelers say, look at reviews for Aon travel insurance – it might help you decide what level of coverage you need.
Planning ahead is key to a smooth and stress-free adventure!
The primary purpose of a battery switch in a travel trailer is to control the flow of power from your batteries to the trailer’s electrical system. This allows you to disconnect your house batteries completely, preventing parasitic drain when the trailer is stored for extended periods, and to select between different battery banks if your setup includes multiple batteries (like a deep-cycle house battery and a starting battery for your tow vehicle).
Battery Switch Types
There are several types of battery switches used in travel trailers, each offering different levels of control. The most common types are the 1-2-Both switch and the simple disconnect switch.
A 1-2-Both switch allows you to select between battery 1, battery 2, or both batteries simultaneously. This is particularly useful for trailers with two batteries – one for house power and another for starting the trailer’s auxiliary engine if equipped. A disconnect switch is simpler, offering only an “on” and “off” position. This completely isolates the house batteries from the trailer’s electrical system, ideal for preventing battery drain during storage.
Operating a Typical Battery Switch
Operating a battery switch is generally straightforward. For a 1-2-Both switch:
- Identify the switch: Locate the battery switch, usually near your battery bank or in a readily accessible location within the trailer’s storage compartment.
- Understand the positions: The switch will have three positions: “1,” “2,” and “Both.” “1” connects only battery 1, “2” connects only battery 2, and “Both” connects both batteries in parallel.
- Select the desired position: Carefully turn the switch to the desired position based on your needs. If you only need power from one battery, select that battery’s position. If you need maximum power, select “Both.”
- Verify power: After switching, check that your trailer’s electrical systems are functioning correctly.
For a simple disconnect switch, the operation is even simpler: Turn the switch to the “on” position to connect the batteries and to the “off” position to disconnect them.
Advantages and Disadvantages of Different Battery Switch Types
The choice between a 1-2-Both switch and a simple disconnect switch depends on your needs and the complexity of your trailer’s electrical system.
| Feature | 1-2-Both Switch | Disconnect Switch |
|---|---|---|
| Control | More precise control over individual batteries or combined power. | Simple on/off control; complete isolation of batteries. |
| Complexity | Slightly more complex to operate. | Very simple to operate. |
| Applications | Ideal for trailers with two batteries, allowing for flexible power management. | Suitable for trailers with a single battery bank or for those who primarily need a simple on/off function for storage. |
| Cost | Generally more expensive. | Generally less expensive. |
Connecting and Disconnecting Batteries
Connecting and disconnecting your travel trailer’s batteries involves using a battery switch, a crucial component for managing power flow and preventing accidental drain. Understanding this process ensures safe and efficient operation of your RV’s electrical system. This section details the procedure, safety measures, and maintenance best practices for optimal battery performance.
The most common setup uses a battery switch to connect or disconnect the house batteries (powering interior appliances) from the chassis battery (powering the engine and vehicle systems). This allows you to isolate the house batteries when not in use, preventing parasitic drain and extending their lifespan. Many switches offer three positions: “Both” (connecting both batteries), “House” (connecting only the house batteries), and “Off” (disconnecting both batteries).
So, you’re planning a trip? Awesome! Don’t forget travel insurance – it’s a lifesaver. Check out aon travel insurance for comprehensive coverage. They offer various plans, so you can find one that fits your budget and trip details. Then, once you’ve got that sorted, maybe browse some travel vlogs for inspiration! I found some great ones while researching aon travel insurance ; their site had some unexpected video links.
Seriously, get insured before you go; you’ll thank yourself later!
Battery Switch Connection and Disconnection Procedure, Battery switch on travel trailer function
Before beginning any work, always disconnect the negative (-) terminal of both batteries. This is a crucial safety precaution. Then, follow these steps:
- Identify your battery switch: Locate the switch, typically found near the batteries themselves.
- Determine the switch positions: Familiarize yourself with the positions (e.g., “Both,” “House,” “Off”).
- Connect the batteries: To connect both batteries, turn the switch to the “Both” position. To connect only the house batteries, switch to the “House” position.
- Disconnect the batteries: To disconnect both batteries, switch to the “Off” position.
- Reconnect the negative terminals: Once you’ve completed your work, reconnect the negative (-) terminals of both batteries.
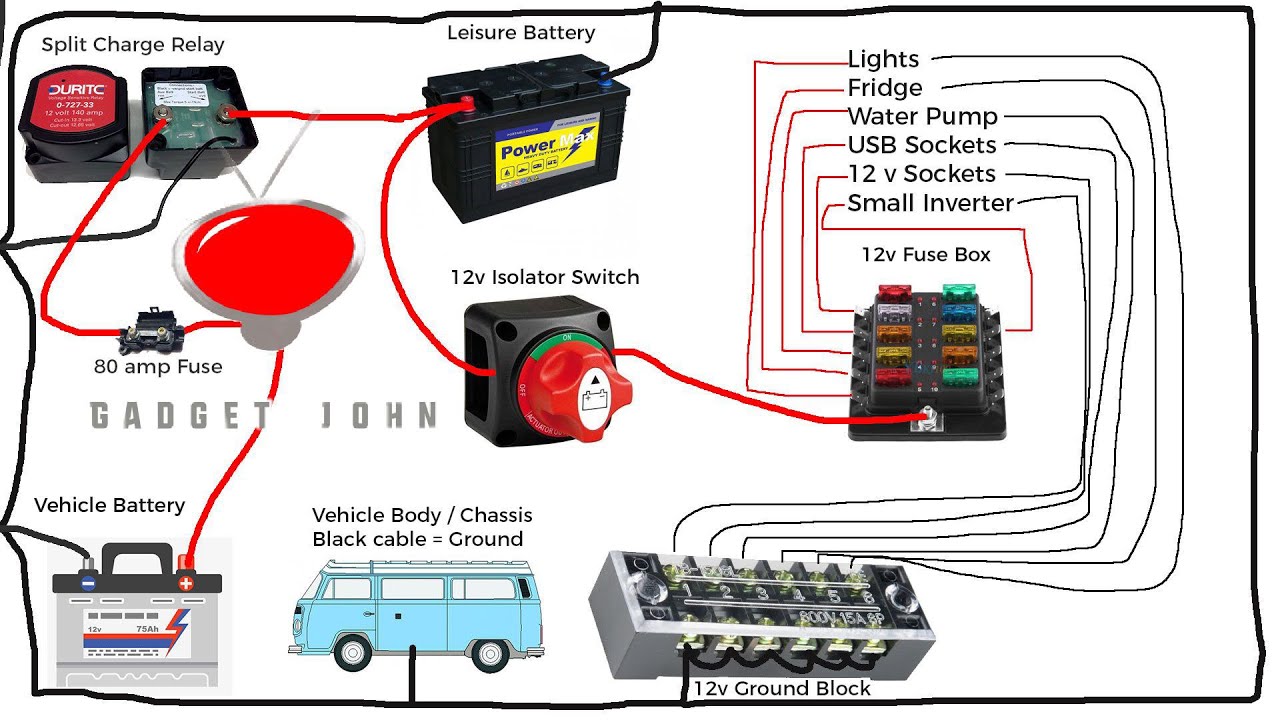
Typical Battery Switch Wiring Diagram
Understanding the wiring diagram helps troubleshoot issues and ensure correct connections. Below is a simplified representation of a common setup:
| Component | Wire Type | Connection Point 1 | Connection Point 2 |
|---|---|---|---|
| Chassis Battery (12V) | Heavy Gauge (e.g., 4 AWG) | Positive (+) Terminal | Battery Switch Input (typically marked “+”) |
| House Battery (12V) | Heavy Gauge (e.g., 4 AWG) | Positive (+) Terminal | Battery Switch Input (typically marked “+”) |
| Battery Switch | N/A | Input (+) Terminals (from both batteries) | Output (+) Terminals (to the RV’s electrical system) |
| RV Electrical System | Various Gauges (depending on load) | Battery Switch Output (+) Terminal | Various Appliances/Components |
| Ground (Negative) | Heavy Gauge (e.g., 4 AWG) | Negative (-) Terminals of both batteries | Chassis Ground |
Safety Precautions When Working with Batteries and Electrical Systems
Working with batteries and electrical systems requires caution. Improper handling can lead to injury or damage. Always adhere to these safety guidelines:
- Wear safety glasses to protect your eyes from sparks or acid splashes.
- Wear gloves to protect your hands from acid and corrosion.
- Ensure proper ventilation to avoid inhaling hydrogen gas, which is produced by batteries.
- Never short circuit the battery terminals by accidentally connecting them together.
- If working near a running engine, be mindful of moving parts and hot surfaces.
- Always disconnect the negative (-) terminal first, and reconnect it last.
Maintaining Battery Connections to Prevent Corrosion
Corrosion on battery terminals can impede electrical flow and reduce battery life. Regular maintenance is crucial:
- Clean terminals regularly with a wire brush and baking soda solution. This removes corrosion and ensures a clean connection.
- Apply a corrosion inhibitor, such as dielectric grease, to the terminals after cleaning. This helps prevent future corrosion.
- Tighten terminal connections to ensure a secure fit.
- Inspect battery cables for damage and replace any worn or frayed cables.
Troubleshooting Common Battery Switch Issues
Your travel trailer’s battery switch is a crucial component, controlling power flow to your house batteries and ensuring a smooth camping experience. When problems arise, understanding the potential causes and how to diagnose them is key to getting back on the road quickly. This section will guide you through common issues, troubleshooting steps, and safe repair procedures.
Common problems with travel trailer battery switches often stem from simple issues, but sometimes deeper problems require more investigation. Knowing how to systematically troubleshoot these problems will save you time and frustration. The most frequent issues involve a complete lack of power, blown fuses, or corroded connections. Less common but equally problematic are internal switch failures and wiring issues.
Addressing these problems promptly prevents larger issues down the line.
Troubleshooting Flowchart for Battery Switch Malfunctions
A logical approach to troubleshooting is essential. The following flowchart provides a step-by-step guide to diagnosing problems with your battery switch.
Start by checking the most obvious things first: Is the switch in the correct position? Are the batteries connected properly? Are the fuses intact? If the answers to these questions are yes, proceed to more in-depth checks. If not, correcting these simple issues should resolve the problem.
If the problem persists, follow the steps in the flowchart below.
| Step | Check | Result | Next Step |
|---|---|---|---|
| 1 | Check the battery switch position (Battery, Both, Off, or similar). | Switch is in the correct position. | Go to Step 2 |
| Switch is in the incorrect position. | Correct the switch position and test. If the problem is resolved, you’re done. Otherwise, go to Step 2. | ||
| 2 | Inspect fuses related to the battery switch and the 12V system. | Fuses are blown. | Replace blown fuses. If the problem persists, go to Step 4. |
| Fuses are intact. | Go to Step 3 | ||
| 3 | Check for corroded connections at the battery switch, batteries, and related wiring. | Corrosion is present. | Clean and tighten connections. If the problem persists, go to Step 4. |
| No corrosion. | Go to Step 4 | ||
| 4 | Test the battery switch using a multimeter (see next section). | Switch is faulty. | Replace the battery switch. |
| Switch is functional. | Check the wiring and connections to the batteries and other components. |
Testing the Battery Switch and Circuits with a Multimeter
A multimeter is an invaluable tool for diagnosing electrical problems. To test the battery switch, you’ll need a multimeter capable of measuring both voltage and continuity. Ensure the power to the switch is disconnected before starting.
Voltage Test: With the switch in the “Battery” position, measure the voltage across the switch terminals. You should read a voltage close to the battery’s voltage (typically around 12V for a 12V system). If you read 0V, there’s a problem in the circuit before the switch. If the voltage is present but no power is reaching the load, the issue is likely after the switch or in the load itself.
Repeat this test with the switch in different positions to check the functionality of each position.
Continuity Test: With the switch in the “Battery” position, set the multimeter to the continuity setting. Touch the probes to the terminals of the switch. You should hear a beep, indicating a closed circuit. If there’s no beep, the switch is faulty.
Replacing a Faulty Battery Switch and Related Components
Replacing a faulty battery switch is generally straightforward but requires careful attention to safety. Always disconnect the battery’s negative terminal before working on any electrical components. This prevents accidental short circuits and shocks.
Steps to replace the battery switch: First, identify the location of the battery switch (usually near the batteries). Next, disconnect the wires from the switch, taking note of which wire goes to which terminal. Carefully remove the old switch from its mounting location. Install the new switch, ensuring that the wires are connected to the correct terminals. Finally, reconnect the battery’s negative terminal and test the system.
If you are replacing fuses or cleaning corroded connections, be sure to use appropriate tools and materials. For example, a wire brush can help clean corroded terminals, and the correct amperage fuse should always be used for replacement.
Battery Switch and Electrical System Integration
The battery switch is the central nervous system of your travel trailer’s 12-volt DC power system. It controls the flow of power from your batteries to the various electrical components, allowing you to manage power sources and prevent accidental drain. Understanding its role is crucial for efficient power management and preventing electrical issues. Proper integration ensures a safe and reliable power supply for all your onboard systems.
The battery switch acts as a gatekeeper, selectively routing power from your house batteries (or chassis battery) to the rest of the trailer’s electrical system. This allows you to disconnect the house batteries completely when the trailer is not in use, preventing parasitic drain and extending battery life. It also allows you to choose between using your house batteries or shore power (external power source) to power your appliances.
Battery Switch and Electrical Component Interaction
This diagram illustrates how the battery switch interacts with key electrical components in a typical travel trailer:Imagine a simple box representing the battery switch. From this box, three main wires extend: one to the converter, one to the inverter, and one to the distribution panel which feeds all the appliances. The batteries connect to one side of the switch box, and the shore power connects to another, with the switch controlling which power source feeds into the system.
A fuse is placed in the line from the batteries to the switch, and other fuses protect individual circuits branching off from the distribution panel.
Below is a table detailing the components, their functions, power requirements, and connection points to the battery switch:
| Component | Function | Power Requirements | Connection to Battery Switch |
|---|---|---|---|
| House Batteries (12V DC) | Provide DC power to the trailer’s electrical system. | Varies depending on battery size and configuration (e.g., 12V, 100Ah). | Direct connection; often fused for protection. |
| Converter (12V DC to 120V AC) | Converts 12V DC battery power to 120V AC household power. | Typically draws significant current from the battery (e.g., 20-50 Amps). | Connected to the battery switch output, often via a heavy-gauge wire and appropriately sized fuse. |
| Inverter (12V DC to 120V AC) | Converts 12V DC battery power to 120V AC household power for high-power appliances. | High current draw depending on the inverter’s capacity (e.g., 1000W inverter may draw 80+ Amps). | Connected to the battery switch output, usually with a heavy-duty fuse. |
| Distribution Panel | Distributes 12V DC power to various appliances and lights. | Varies depending on the connected appliances. | Connected to the battery switch output; individual circuits within the panel are further protected by fuses or circuit breakers. |
| Appliances (Lights, Water Pump, etc.) | Various 12V DC powered devices in the trailer. | Varies widely depending on the appliance (e.g., LED lights draw less than incandescent). | Connected to the distribution panel, with each circuit individually fused or protected by a circuit breaker. |
Circuit Protection and Fusing
Proper fusing is critical to prevent damage to your electrical system and avoid fire hazards. Each circuit connected to the battery switch should have its own fuse or circuit breaker rated appropriately for the maximum current draw of that circuit. The fuse or breaker should be placed as close as possible to the power source. For example, a 30-amp fuse should be used for a circuit that may draw up to 30 amps.
Larger fuses than needed offer less protection and may allow dangerous overloads to persist. The main line from the batteries to the switch itself should also have a large-capacity fuse, typically rated higher than the sum of all individual circuit fuses to protect the entire system from short circuits or overloads. Always use fuses with the correct amperage rating.
Using an incorrect fuse can result in circuit damage or fire.
Battery Switch and Solar Panel Integration (if applicable): Battery Switch On Travel Trailer Function

Adding solar panels to your travel trailer significantly boosts its off-grid capabilities, but integrating them correctly with your battery switch is crucial for efficient charging and safe operation. This section will explain how your solar system interacts with the battery switch, explore different integration methods, and highlight their advantages and disadvantages.
Your battery switch acts as the central control for your trailer’s battery banks. Solar panels, however, typically have their own charge controller that regulates the flow of power from the panels to your batteries. The interaction depends heavily on how your system is wired.
Solar Panel System Configurations
The way you integrate your solar panels with your battery switch depends on your setup and preferences. There are several common configurations. In the simplest setup, the solar charge controller connects directly to the battery, bypassing the battery switch. This means the solar panels will always charge the batteries, regardless of the battery switch position. More complex systems might incorporate the battery switch into the charging circuit, allowing you to control solar charging as well.
Benefits and Drawbacks of Different Integration Methods
Let’s compare the direct-to-battery and switch-integrated methods. The direct-to-battery method offers simplicity and continuous charging, but you lose the ability to disconnect the solar panels from the batteries. The switch-integrated method provides more control, allowing you to completely isolate the solar panels if needed, but adds complexity to the wiring and may require a more sophisticated charge controller.
- Direct Connection: Simple wiring, continuous charging, but no control over solar charging.
- Switch-Integrated: More complex wiring, allows for complete isolation of solar panels, but adds cost and complexity.
Travel Trailer Electrical System Diagram
Imagine a diagram. At the top, you see your solar panels on the roof, connected to a solar charge controller. The charge controller is then connected to your battery bank (either a single battery or multiple batteries wired in series or parallel). The battery bank is also connected to your travel trailer’s 12V DC system (lights, water pump, etc.).
This system is controlled by the battery switch. The battery switch itself has several positions: typically one for each battery bank (if you have two), one for “off,” and potentially a position that combines both banks. A separate charging system, perhaps a converter from your tow vehicle or a shore power hookup, can also be connected to the battery bank, typically through the battery switch.
The flow of electricity is from the solar panels to the charge controller, then to the battery bank. From the battery bank, power flows to the 12V DC system of your trailer, controlled by the battery switch. The shore power converter/charger can also charge the batteries, with its flow regulated by the battery switch. Finally, all components are properly fused and grounded for safety.
Mastering your travel trailer’s battery switch is key to a smooth and enjoyable RV experience. By understanding its function, performing regular maintenance, and knowing how to troubleshoot common issues, you’ll ensure reliable power for all your adventures. Remember safety first when working with batteries and electrical systems. Happy travels!
Questions and Answers
What happens if I leave my battery switch in the “off” position?
Leaving the switch off completely disconnects both your house and chassis batteries, preventing any power drain. This is good for long-term storage but means no power to anything in your trailer.
How often should I check my battery connections?
Inspect your battery connections at least once a month, or more often if you notice any unusual behavior. Look for corrosion and tighten any loose connections.
My battery switch is making a clicking sound, what’s wrong?
A clicking sound often indicates a faulty switch or a problem with the circuit breaker. Check your fuses and circuit breakers before replacing the switch.
Can I use a battery switch with a lithium battery?
Some battery switches are compatible with lithium batteries, but others aren’t. Check the specifications of both your switch and battery to ensure compatibility. Improper use can damage your lithium battery.
